I have had this 1986ish arcade machine, currently running the Aero fighters game. Now whilst i have a few different arcade games to plug into this, it gets a tad boring. About 3 years ago i came accross a Xbox homebrew application called CoinOps (http://coinopsproject.freeforums.org) , At the time i wanted to use it with the arcade machine but I didnt really know where to start, i ended up with an xbox in pieces and got a good shock off a capacitor and gave up. Untill a few months back i found a modified xbox in cash converters for 10 bux. So i grabbed it.
Now i really only had one goal and that was bring the arcade machine into the 2000’s whilst still allowing me to play the original jamma arade games. So this means no major modifications to the arcade machine..
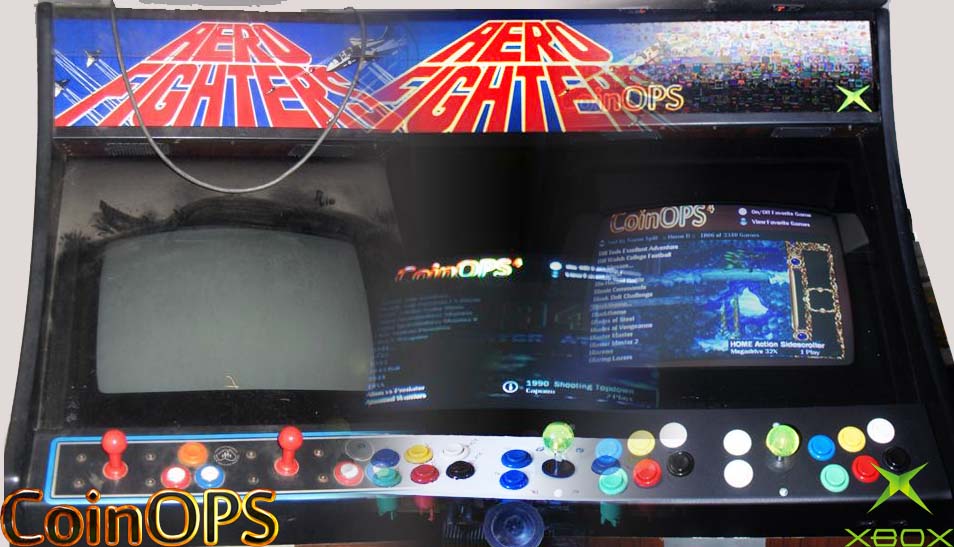
Here is the LAI Aero Fighters cabinet before i did anything to it.

This picture is the xbox jamma timer adapter, this has 3 plugs that plug into the Xbox, 1 for AV and 2 for controller/usb and power. You can pick these adapters up off ebay for ~$40. Incase your wondering what the controller cables are plugged into, that is the controller ports 3 and 4 from my previous broken xbox. I actually have a use for this later.

Here is the pre-modded (i could tell by the warrenty void screw holes on the underside) xbox i picked up at a pawn shop for $10 bux, only issue was that the tray didnt open and incase you dont know this is a common issue and you just need to give it a bit of a whack on the top to get it to open, next to it is the IDE HDD im putting in to store the coinops software (320gb iirc)

Inside the Arcade machine there is a female jamma connector (LAI 22 way in my case). there is then an extension cable/harness from this female connector that then plugs into the game cartridge. The cartridge in this case will be the xbox jamma adapter. This cable connects all the arcade bits together, sound, video, controllers etc. I grabbed a bunch of stuff from ebay back a few years back ~$40. Turned out i didnt have enough buttons and would need some more later down the track). I also purchased a full jamma harness (on the left) to help in the wiring up of the new buttons etc.

I used the full jamma wiring harness and some LAI 22way/jamma fingerboards., to create a new harness that would allow more buttons as the jamma timer board uses a non standard pinout see for yourself (XBOX-JAMMA Timer board Manual). Here i am soldering all the wires on except the buttons and joysticks.

So I sat down with the Xbox timer board schematic and connected everything but the controll panel (CP hence forth) and start/coin to the fingerboard. This way i could use the old jamma harness with the new harness im building to allow me to just dissconnect the current CP and wire up a seperate CP for coin-ops. So if i wanted to play aerofighters again i could just pull this new harness out and put the old one in and CP and bang i would be back playing the old original game. This is me labeling all the connections that will be plugged into a new CP.

Next step was a mock-up and prototype a new 20 + 2 joystick CP, this is what i came up with:

I used the xbox controller test to test the layout, I uploaded it as its a pain in the ass to find. Download Xbox controller Test (I don’t believe its copyright)
After this successful test I drew up a new CP design and sent it off to get laser cut, I actually managed to fit 2 on a single piece of black frosted acrylic, This is good in case I break or damage one I have a backup. Also on the right hand side there are a bunch of small rectangle cuts some with holes. the smaller and larger ones will be glued together to form a catch to hook the base of the CP into the arcade machine. The ones with the smaller holes are built to give me xbox controllers on the front of the CP just in case i want to play some games that need analog joysticks.

To get this panel cut i use a great online laser cutting/3dprinting service called Ponoko. It cost $60 and would have been less again if i hadn’t duplicated the CP. Ponoko have Cutting and 3D printing shops all over the place, visit them and give them a go.
![]()
A week or two later i got a nice big package in the mail:

With the protective sheet removed the new CP is shown off in all its glory.

I had the new control pannel, but i needed a way to bend it to the standard CP angle (A little over 90 degrees). So i built a crude but effective perspex bender with some nichrome wire and a laptop power supply. Here is a vid i did about it.
And here is a link to the nichrome wire calculator i used: Hot Wire Cutter Calculator
So after bending the perspex and throwing some of the buttons in (With a few new buttons so i have enough white and black) you get something that looks like:

In the design i showed off previously i loosely covered the bunch of small rectangle pieces, these are glued together (With propper acrylic adhesive) to make hooks to hook the bottom of the CP into the arcade chassis. Also in the design above there are a few with two smaller rectangles cut out of the other rectangles, these holes are made from the spare xbox front ports i had lying about, to give me xbox ports on the front of the CP. Here is a pic of the ports glued into the perspex brackets/hooks

And once all the hooks are glued and set and the front ports are installed it looks like:

So with the Harness done and tested its now time to install the xbox inside the arcade machine. This is a look inside with the coin drawer out and unscrewed. On the left you can see a Super mario Bros original nintendo board, in the middle next to the coin box is a power distribution board, i am lead to believe that only Aussie LAI machines used these.

After a bit of hammering i removed the wood brackets holding the coin box up, and placed the xbox into its new position.

So now i needed to put the support bracket back in. If this were to be in an arcade again this potentially wouldn’t be sufficient under the weight of coins, but as its home i dont see any real issues. Biggest real issue i had was conveniently (sarcasm) the bracket was right over the front 1 controller port and the rear ethernet port, so i routed some of the wood away in this area to make life easier.

Look how sweet it looks with that lid back on fits perfectly, you can hardly tell its there.

Now comes some really nifty stuff IMO, As i pointed out before the silver box is a power distribution board (raw in voltage AUS 240V) this was perfect as i could in theory hook up the console directly to it for power, and i wouldnt need to worry about another lead coming into the machine. Problem i hit here was the plug was a proprietary plug. And while i could find them i could only get them in lots of 1000 for 60 bux. Luckily enough i found a shop that makes arcade machines and sells parts literally 20 minutes away from my house.

This guy is gold, knows his stuff, happy to help and give advice etc. While i was grabbing a few more white and black buttons to finish the machine I asked him about these connections he walked out the back and snipped one off for me, fan-bloody-tastic otherwise i would need to run a power cable into the machine. This is the connector im talking about.

So thats the connector and the xbox power cable has been soldered and head shrinked onto the end of this, the Ground is ignored as the xbox doesn’t use it. Be careful here as this is 240V and i take no responsibility for anything that you do. And here is the finished cable.

I should have thought about this sooner but i wasn’t sure how i should go about turning the xbox on automatically when power is on. But thanks to a thread here (viewtopic.php?f=14&t=476&hilit=toothpick ) I got the tip to jam the button in with a tooth pick. Therefore when the cab has power the xbox boots up. I should have thought about this before installing the xbox in the cab as i would have used a screw, but the tooth pick works a treat. See it here in its unfocused glory: ignore cables draping across i was testing something.

Okies lets quickly look at how I wired those front controller ports up. They are currently connected to controller 3 and 4, I did think about connecting them to controller 1 and 2 but in the end I decided i could put up with moving the plugs internally if needed. But i am happy for the suggestions, as I’m always looking for a better way.
Anyway the first thing i wanted to do is find something i can make an extension cable from for the front ports, I know you can buy them but I didnt want to wait 5 weeks for them to arrive in Australia. I also thought about using an Xbox controller but all the ones i own are in great condition and $15 off ebay and pawn shops seemed a little too steep to just hack and slash. As i was looking i found 2 xbox DVD remote controls and receivers for $5 each.. perfect. Controllers in the parts box and you end up with some of these:

Run a plastic card around the outside to un clip the front bezel from the back (or just pry it off), and you get this inside.

The black bit in the center is the IR receiver, just below that you will see 7 pins, using a hot air gun or a soldering iron (W/ solder sucker) heat those pins up and pry the PCB free of the pins. You may get one or two pins come out of the plug at the back just put them back in carefully. When you have successfully removed this it should look like this :

From here I grabbed some ribbon cable and cut off 6 strands about 1m long. Stripped and tinned the ends of the cables put some heat shrink tubing on the cables and soldered them to the xbox IR port. So it looked something like this when finished:

Rinse and repeat with the second one. Now you may be wondering “well where does each wire then get soldered to on the controller port?” WEll all you really need is a cheap multimeter set to circuit test.

Then i plugged my IR port (male) into the controller ports (female) I wanted to connect up. Then i connected one end to a cable coming out of the IR port to one lead of the multimeter, and the other lead of the multimeter i connected to the cables on the back of the controller ports, when i saw a circuit I know it was the right connection, and i stripped, tinned and soldered those two leads together then put heat shrink and repeated for the 5 other connections. Then do it all again for the second controller port and modded cable.
Now id you notice that you have more then one lead making a circuit it means you may have got a bit excited with soldering and you have a short somewhere on the IR pins. Also you most probably don’t want to run these ribbon cables next to a power cable just because they are not shielded well, but so far i have had no issues (only over 1 meter). Thats pretty much it for the controller ports they are really just extension cords.

Due to the xbox > jamma converter i only have mono sound out. There are 2 choices on the jamma adapter, mono RCA out or through the jamma adapter. I originally used the jamma adapter output as it worked well, but i soon started noticing crackling etc and turns out they were using some real cheap amp IC that seemed like it was a bit close to a few 12V runs. Talking with Danny from Gameroom Essentials (picture further up has his business card) he showed me a little 12V mono amp he uses in his arcade systems, from memory it was $15ish.

I later looked up the specification on the IC on this and its about 5W output, which is easily enough for a home arcade machine. To be honest before i purchased this amp i went looking elsewhere for a small amp and i couldn’t find anything close to the price and the quality i had heard from the one Danny was selling, and it turned out he got them custom (by request) made.

Its a pretty simple circuit to wire up, source comes in next to the volume knob (this is connected to the RCA connection on the jamma adapter). on the rear you have 12V and gnd, then output to speakers. Also cool to notice that when you connect the RCA to the jamma harness it automatically stops the amp on the adapter from working.

I had initially purchased some little 2W speakers to replace the old ones in my cabinet, but it was impossible to remove the speakers without taking crt out etc. So i just used what i had in there already. However it was missing any bass, perfect for pacman and aerofighters but anything more sounded dead and lifeless. I found 2 6*9 car audio speakers lieing about from a car rebuild. I hooked these up and i had the deep sound i was after, and this little amp and those speakers are really loud.

I needed a way to mount them without being too obvious so i went to the local auto store and for $20 i got two 6*9 car speaker boxes, i cut these down slightly to fit the width of the arcade machine and installed them on top. From here i actually spliced the cable running these speakers into the original arcade speakers which was perfect as it gives bass with the authentic high pitch arcade speaker.

And here is the mounted jamma harness and amp (held down with double sided tape on the edge, but i will mount these with plastic stand offs when i get some. Now i have picture, sound, controls and games all sorted all that’s left to finish it is a marquee to replace the old Aero Fighters one.

After spending a few hours in Photoshop I came up with the 2 designs above, 2 designs as it costs the same to print some colour as it does all colour at A2, I also wasn’t sure how they would turn out and look. (This is a smaller copy but if your interested in the full one for printing send me a PM or something and i will put it up ~200mb).

I chose to get the print on 200gsm paper and laminated. All in all this cost ~$25 Aud using officeworks online printing. And it arrived the next day for pickup which was awesome. Above is a shot has the one I chose to use cut out (The one with less images in the BG)

And here she is with the new marquee, the camera struggles to give a good representation on how it looks in real life. From here i only have a few little things i would like to try, 1 is put some thin white perspex behind the marquee (currently is transparent) to see if it gives a slightly better light. and then put the clear perspex on the front. I also really dislike the joysticks I am using on the new control panel, when using them they spin on themselves and you find your hands slipping off because of that. Next i will start a new topic on how to get wifi network into the arcade machine or to your xbox for under 30 bux, i will link this here as well. So here she is:
 Thanks for reading, if you have any suggestions, questions or comments let me know.
16 Jun ’12 at 11:24 pm
bloody fantastic so when are you going to build one for me
28 Jul ’12 at 2:14 am
Hy, great job you did, i’m on a search for a jamma arcade to connect to my XBOX. Do you have any advice on what I should be looking for? Since i’m buying the arcade…
I’ll be on a lookout for a 6 button per player arcade and a jamma interface.
Thanks