Converting a Cheap Ikea LACK Bookcase into a kick-ass Entertainment center.
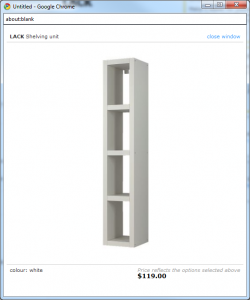
The sotry began when i decided we needed a new entertainment unit. The one i had was old sckool wood and just looked terrible. I looked around but all the ones I liked seemed to be $500+ I came upon this ikea LACK bookcase for $99 at ikea and i thought i was almost perfect.
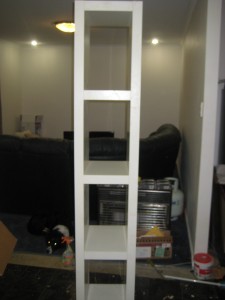
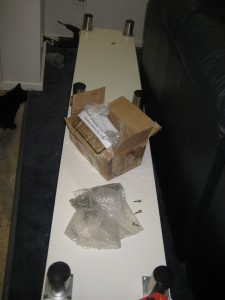
So i used it as it was as an entertainment center for a few months, but after we got new carpet i thought it was about time i put my plan into actions. Thanks to ebay i found some kick ass feet for my bookshelf and ended up costing abotu $60 inc shipping. Here i am laying the feet out and getting ready to screw them on.
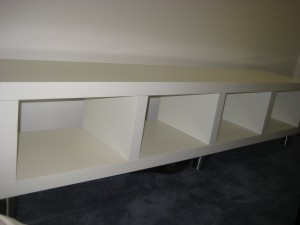
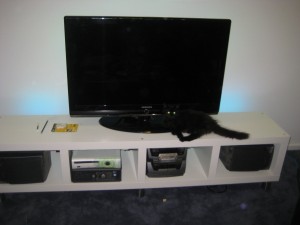
Feet on and situated in the rough rite location. Came out pretty good.
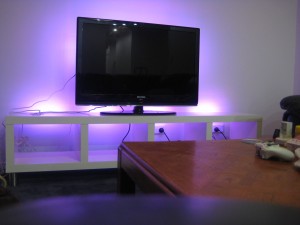
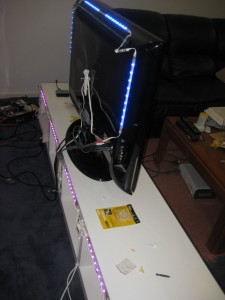
Now it was time to make it cool. I grabbed 2 packs of ikea DIODES led light strips (99$ each although one was ASIS so it was $35) Here is a pic of them roughly hooked up to make sure i had the layout correct.
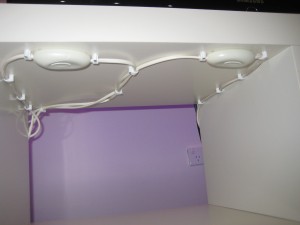
Once i had the LEDS in their correct location it was time to fasten all the cables so it looks neat also so the cat doesnt play with them and eat them. Yes you CAT.
A quick trip to bunnings for some cable fasteners and here we go:
I located the power buttons and the colour changing buttons under one of the holes for easy on and off.
And heres a video of it all done and working:
So in total i have spent about 300, but it is a one of a kind (for now) and what i wanted.
Good luck all.

11 May ’10 at 12:35 pm
NICE !!!
11 May ’10 at 8:54 pm
I loved the cat. Your hack is perfect but your cat is amazing, specially when he’s behind the LACK and those big eyes that can been seen when you turned the LEDs on again.
13 May ’10 at 5:22 am
Brings a whole new meaning to ‘Backlit LCD Screen’
16 May ’10 at 12:03 am
Are the LED’s rigged up to show a certain colour when the tv displays a lot of that colour?
16 May ’10 at 12:45 am
How did you get the colors to match up with what’s on screen? Some sort of amBX setup?
16 May ’10 at 2:07 am
No its just a fluke that they matched up.
16 May ’10 at 3:34 am
What the size of our LCD and model of your LCD?
16 May ’10 at 9:40 am
Samsung 40″
16 May ’10 at 3:37 am
I actually did the exact same thing as you did, but I hung mine on the wall using L-Brackets and a Stud Finder. ‘course that means I also needed to mount my TV on the wall.
16 May ’10 at 9:40 am
I like the LCD on the wall look but when i tried it i didn’t like the results 😛
16 May ’10 at 6:18 pm
Great setup – what Ebay seller did you get the feet from? Or, what did you search for? Those look great!
16 May ’10 at 10:01 pm
I used a seller on ebay australia called “sydney_accessories”. I found them by searching chrome feet / furniture feet. Thanks for the complement.
17 May ’10 at 11:07 am
You are so cool man! i ve been doing all kind of hack/diy thing by myself about a year yet i couldn’t achive any permenant stuff but still enjoying the tries and even fails
17 May ’10 at 11:20 am
Very awesome! It’s super thrifty and is the perfect stand.
17 May ’10 at 1:36 pm
Dude, you seriously got ripped off on the LED lights. It prob should have cost about 5 dollars. Nice setup tho and A+ for giving it a go
17 May ’10 at 1:47 pm
I did think about grabbing some led ribbon and do it myself. But i wasn’t confident is producing something that i knew wouldn’t burn my house down 😉 It was easier to just buy these in the end.
17 May ’10 at 1:41 pm
Nice… Do you have a link to the feet on ebay?
17 May ’10 at 1:45 pm
http://cgi.ebay.com.au/6-X-Silver-Chrome-Feet-Sofa-Lounge-Chair-Couch-/170485044537?cmd=ViewItem&pt=AU_Living_Room_Furniture&hash=item27b1b35539
are the feet i grabbed.
22 May ’10 at 1:41 pm
Nice one! That is awesome.
Thanks alot for this and glad I found it. I have been considering getting a black one and modifying the shelves so there are 2 instead of three so I can fit all my av kit (about 45cm wide each) in there. The plan is to cover up the holes for the original shelve positions by sitting my av kit on top of them and use super-glue and nails to position the two in their new spots. My concern is if the nails will crack the finish. What do you reckon?
Thanks again.
Cheers
22 May ’10 at 1:52 pm
Andrew,
I actually only found out about this issue yesterday when i tried to stick my new home theater system in there. I dont see that there should be any problem with removing the shelfs and using liquid nails (not nails)to stick them to their new positions. I dont think nails are needed because the only reason they were screwed in to begin with was because it was a vertical bookcase and each shelf had to take vertical weight. With it ;layign down the shelfs are only providing structure to the top beam. I am actually planning on doing a similar change to this either tomorrow or next weekend. I will blog it and let you know.
25 May ’10 at 5:33 am
Hi Marc,
Yeah I measured it at Ikea and it was close but not enough, I had a good look around the other shops too but were all pretty much the same measurements. Liquid nails sounds like the plan, the feet are also a great idea. I had originally planned to slum it lying on the floor but my couch has wooden feet about 1inch high by 4inch square and will see if I can pickup similar small feet through fleabay or maybe try Bunnings. Also thinking aswell as the glue might grab a couple of 3-4 inch nails to nail into each shelf from the bottom so it doesn’ t matter if it scars the surface but will provide stability to each shelf for supporting in my case a 40kg tv.
Thanks, looking forward to the new blog and I’ll see if can do the same, will be my first 🙂 Bloody good idea and bargain for only $100+ with a bit of modding.
Cheers
Sweet – same place you got yours from – 6 X RectangularTimber Feet For Sofa Lounge Chair Couch..
http://cgi.ebay.com.au/6-X-RectangularTimber-Feet-Sofa-Lounge-Chair-Couch-/170487658880?cmd=ViewItem&pt=AU_Living_Room_Furniture&hash=item27b1db3980
Thanks again
25 May ’10 at 9:06 am
I was actually measuring it up today, it looks like they are literally 15mm too small.. so im planning on moving the right and left dividers towards the middle by 15mm (or away from the middle depending where i want the AV equipment). I am almost 100% sure i will be able to re drill the dowel holes 15mm off center and actually use the stock ikea dowel to hold it together.
29 May ’10 at 5:09 am
Nice.. actually that is perfect for me too. Thought the prob is I have 3 separate pieces of HT kit but can stack them (sounds obvious but never occurred to me till just now) and height is 24cm, never measures this but will that fit ok? So I could keep the centre shelf and move others out a few cm each to fit the AV gear in the middle and then have space on the ends for discs, PS bits & bobs etc.. Be much happier to have the middle shelf directly under the TV.
Sweet. Now I just need the tools 🙂
2 Jun ’10 at 5:08 pm
It looks cool, but serious question: doesn’t that constant color changing drive you nuts after a while? I can only imagine how often it would change in a two hour movie.
6 Jun ’10 at 12:51 pm
Its actually pretty dull compared to the TV it looks great and so far i haven’t found it distracting when watching TV or playing games.
6 Jun ’10 at 11:34 am
Hello. I really like your entertainment center and am planning to use your idea. Do you happen to know the inner dimensions of the four shelves? I have a DVD player that is just shy of 16 inches (40.6 cm) wide. I also have a mini-stereo that is exactly 10 inches (25.4 cm) tall. Do you think the shelves would accommodate these two items? Once again, great idea!
6 Jun ’10 at 12:49 pm
I just measured one of the shelfs. it was 41cm wide and 25cm high EXACTLY. So im not sure if there are rubber feet on that mini stereo that you can take off to drop that extra .4cm. And as for the width im actually in the process of re modifying it to make the center spaces accept the standard width of audio equipment width (43cm)
6 Jun ’10 at 9:09 pm
Thanks a lot! I appreciate your help. Just curious: do your modification plans simply involve drilling now holes to make the middle two shelves wider, or is it more involved than that? I haven’t seen the unit itself up close, so I don’t know how the shelves are attached. Thanks again.
6 Jun ’10 at 10:50 pm
Yes the plan is to drill the holes about 15mm off center in the sections, this should be enough to fit std audio gear in.
7 Jun ’10 at 9:34 am
Thanks again!
9 Jun ’10 at 5:16 pm
Hi Marc how did you attach the leds to the TV?
24 Sep ’10 at 8:50 am
Very cool!
3 Oct ’10 at 4:38 am
Any update on making the two middle sections wider? I bought this shelf and put some legs on only to find out the standard width is 16 inches, I need 16.5 or 17 for a standard AV receiver. I think I’ll be able to drill new holes in the center, thoughts?
4 Oct ’10 at 10:33 am
I havent done mine but i did work out if you redrill the two center pieces 15mm in both directions that you will have 2 that fit the standard AV equipment.
10 Jan ’11 at 11:06 am
Marc how did you sync the leds with tv music volume ?!?!?
10 Jan ’11 at 4:25 pm
I think its just an optical illusion they are are not connected in any way 😛
8 Dec ’11 at 8:54 pm
hallo m friend and thx for good idea!but i dont understand how you connect leds with tv!???and the leds have same color with tv!
18 Dec ’11 at 9:13 pm
Something like this will work https://www.adafruit.com/products/461
22 Jan ’12 at 10:57 pm
Hey, great idea! love the explanation, too..
just one question: dude, what were you watching on tv? lol
23 Jan ’12 at 6:57 am
Thanks, and on tv was Doctor Who.